Back-to-School Sweet Snack Charcuterie Board That’ll Make the Grade!

This post contains affiliate links. I only recommend products I use and love. Read the full disclosure here
Back-to-School Charcuterie Board brings A+ snack-time fun with edible pencils, notebook cookies, red apple pretzels, and other bite-sized classroom cuties!
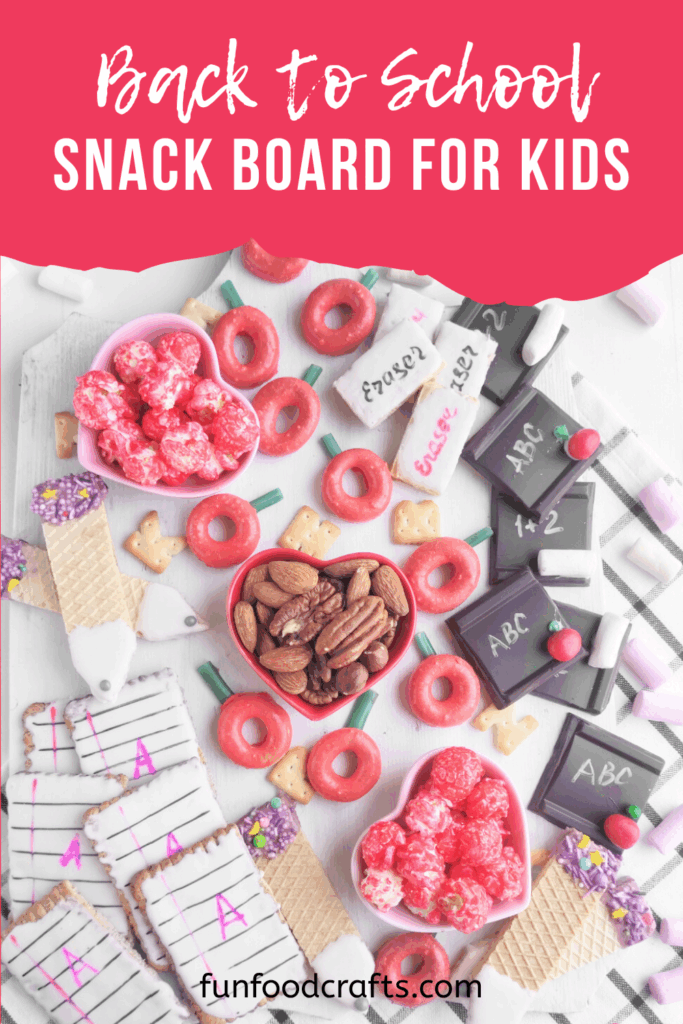
The school bell’s about to ring, but that doesn’t mean the fun has to end! This playful board is packed with sweet supplies like cookie pencils, candy notebooks, and red pretzel “apples” — a back-to-school snack board that’ll turn those end-of-summer blues into snack-time smiles!
This Back to School Charcuterie Board is loaded with A+ treats including chocolate chalkboards, candy apples, notebook grahams, and pencil-shaped wafers that are way more fun than homework. Perfect for kicking off the school year or celebrating surviving the first week!

This kids snack board is fun, easy, and absolutely perfect for:
Let’s break down how to make this edible A+ board of cuteness, no grades required.
Ingredients You’ll Need
Here’s everything you’ll need to turn snack time into an academic adventure:
🍪 Cookie Confession Time: Round G crackers? Basically unicorns. If you spot them, grab ‘em. But if not, no worries! Vanilla wafers, shortbread rounds, or any small round cookies work just as well.

Tips for Crafting Your Back-to-School Snack Board
✅ Use what you have – you don’t need to buy all new snacks!
✅ Mini bowls add height and variety.
✅ Place themed treats in clusters so they really pop visually.
✅ Add a mix of textures and colors to keep it exciting.
✅ Let the kids help decorate (they’ll love drawing ABCs on chocolate)!
Step-by-Step: How to Make Your Back-to-School Sweet Snack Charcuterie Board
This sweet charcuterie board is all about edible school supplies, and no, you don’t need straight A’s in baking to make it happen. Most of this is melt, dip, draw, and assemble. Here’s how to bring it all together:
Step 1: Make the Notebook Sheet Cookies
- Snap or cut your rectangular grahams in half carefully.
- Melt white chocolate chips and spoon over the tops of the graham cracker halves spreading it as evenly as possible.
- Place them in the fridge to help the chocolate set (for at least an hour)
- Once completely set, use a clean ruler and edible markers to draw blue notebook lines and a red margin.
- Add letters or doodles for extra cuteness.

Step 2: Build the Apples
- Melt the white chocolate and tint with a few drops of red food coloring.
- Dip the round crackers into the red chocolate and chill on a parchment-lined tray until set.
- Before the chocolate sets, cut green licorice or a Fruit Roll-Up into stem or leaf shapes and stick on top.
- Add a smaller piece of licorice/Fruit Roll-Up to the tops of the red M&Ms, again using a dot of melted chocolate as the glue. Place on the tray to set.

Step 3: Create Chocolate Chalkboards
- Use a sharp, clean knife to cut a dark chocolate bar into small squares.
- Write ABCs or simple math problems with edible marker.
- Then use a tiny dot of melted chocolate or frosting to “glue” the small apples on to the chalkboards.
🪄Pro Tip: Having trouble cutting the chocolate chalkboards? Try warming the knife first then cut before it cools.
Step 4: Make the Pencil Wafer Pencils
- Trim sugar wafer cookies to resemble pencils, making sure one end is angled for the pencil tip, and leave the other end as-is.
- Next, dip the “tips” in the melted white chocolate and add a sprinkle ball at the tip for the pencil lead. Let chocolate set.
- For the eraser cap, I tinted some of the melted white chocolate purple (use gel-based food coloring) and dipped the eraser end into it. I then added sprinkles to form the eraser.

Step 5: Make Wafer Erasers
- To make the larger, hand held erasers, simply cut small wafer sections into rectangles and then dip in the melted white chocolate.
- Place in the fidge to set.
- Once set, use an edible marker to write the word “eraser” on them.
Step 6: Create the Marshmallow Chalk
- This once is super easy as all you do is cut chalk shapes out of the large marshmallows. You could also try stretching out mini marshmallows, but I found cutting the larger ones work best.
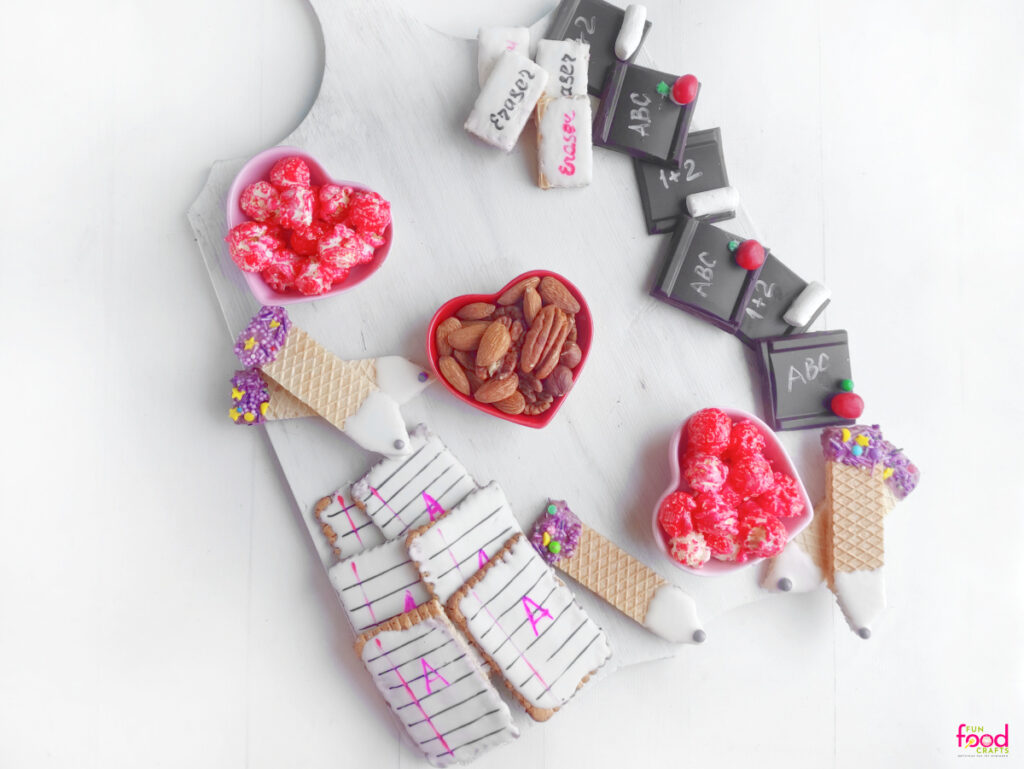
Step 7: Assemble Your Board
- Start with your statement pieces: notebooks, apples, and pencils.
- Then add in small bowls of red popcorn and nuts to create height.

Step 8: Add Fillers
- Fill in some of the spaces with the alphabet and number crackers.
- Want less empty space? Use small candies, sprinkles, mini marshmallows, nuts, or any other small treats.
And that’s it! One charcuterie board, a bunch of snackable school supplies, and zero homework. A back-to-school treat so clever and cute, even the principal would give it a gold star!
✨ Snack Swaps & Extra Credit Ideas
There’s no wrong way to make this board! Feel free to mix it up with whatever snack-time goodies you’ve got on hand! Here are a few fun ideas to try:
🍎 Mini Apple Switch-Ups – Can’t find round graham crackers? No worries! Vanilla wafers, shortbread rounds, or even round pretzels make adorable apple bases.
🍏 Make It Real(ish) – Turn your chocolate-dipped “apples” up a notch by adding a piece of pretzel or nut stem! Chef’s kiss.
🥜 Nuts for Details – A sprinkle of mixed nuts not only adds crunch but also makes the board feel a little extra smart-snacky. Pecans, almonds, hazelnuts—take your pick!
🧠 Let Imagination Take Over – Add candy rulers, cookie crayons, or even gumball “globes.” The sky’s the limit (and no cafeteria rules apply).
Final Tips + Storage Notes
- Assemble up to 2 hours in advance and store in a cool spot (away from direct heat or sun).
- If you need to make some parts ahead (like the pencils or chalkboards), store them in airtight containers until ready to serve.
- Don’t stress about perfection, the more variety and personality, the better!

✏️ Hungry for More?
If you’re into turning everyday snacks into edible masterpieces, you’re totally in the right classroom. 💁♀️🍎
Check out these other school-themed treats and kid-friendly snack crafts that’ll have your lunchroom looking like a Pinterest board:
New fun food crafts are always being added, so don’t forget to pin, bookmark, or scribble a reminder in your planner to come back for more sweet snackspiration!
✨ Show Me Your Snack Board Magic!
Did your back-to-school snack board earn an A+? I want to see it! Tag @funfoodcrafts and use #funfoodcrafts so I can hype you up! 📸🍎✏️
Want to save this post? Pin it to your favorite Back-to-School or Snack Time board on Pinterest. Then share it with your teacher friends or fellow school snackers!
🎉 Show Off Your Snack Smarts!
If you recreate this Back-to-School Charcuterie Board, I would love to see it! Snap a picture, tag me on Instagram @funfoodcrafts and use #funfoodcrafts so I can cheer you on. Seriously, I live for this kind of cute chaos.
Printable Recipe Card
Back-to-School Charcuterie Board (Sweet Snack Idea for Kids)

Build the cutest Back-to-School Charcuterie Board filled with candy pencils, notebook cookies, pretzel apples, and more snackable school-themed treats. A fun and festive kids charcuterie board that's sure to make the grade!
Ingredients
- 3 rectangular graham crackers
- 10-12 round graham crackers or other round cookies or pretzels, for apples
- Red Peanut M&Ms for smaller chalkboard apples (one for each chalkboard)
- 1 piece green licorice or Fruit Roll-Up - for apple leaves/stems
- 1 large dark chocolate bar
- ⅓ cup mixed nuts (pecans, almonds, hazelnuts)
- 1 cup red popcorn
- 1 cup white chocolate chips or bright white candy melts
- Marshmallows
- alphabet and number cookies or crackers
- red gel food coloring
- purple or other color gel food coloring
- edible markers
- Sprinkles
Instructions
For the Looseleaf Paper
- Break grahams in half.
- Melt white chocolate until smooth.
- Using a spoon, cover the tops of the graham crackers with the white chocolate.
- Place in fridge for at least one hour to fully set.
- Once set, use edible markers + a clean ruler to draw notebook lines, margins, and letters.
For the Sweet Apples - Large and Small
- In another bowl, tint some of the white chocolate red.
- Dip the round cookies until covered.
- Cut and add green licorice or Fruit Roll-Up “leaves” to the apples before chocolate sets.
- Cut smaller pieces of green licorice and stick to the top of the red M&Ms using a dab of chocolate as glue.
- Chill to set.
For the Chocolate Notebooks
- Cut chocolate bar into squares. Heat the knife if needed to help.
- Using edible markers, write ABC or 123 on one side.
- Then using a dot of melted chocolate as glue, attach an M&M apple to each chalkboard.
For the Sugar Wafer Pencils
- Cut the sugar wafers to resemble pencils, making sure one end is angled for the pencil tip, and leave the other end as-is.
- Dip the pointed end into the melted white chocolate and add a round ball sprinkle for the lead.
- In a small, separate bowl of melted white chocolate, add a few drops of purple food coloring to tint.
- Then dip the other end of the pencils for an “eraser.” and add sprinkles before it sets.
For the Sugar Wafer Hand Erasers
- Cut wafers into rectangles.
- Dip in white chocolate. until coated.
- Chill to set.
- Once fully set, use edible markers to write the word “eraser” on them.
For the Marshmallow Chalk
- Cut marshmallows into chalk shapes.
Assemble Your Board
- Place themed treats first.
- Then add small bowls of red popcorn and nuts for height.
- Fill the spaces with the letter and number crackers.
- If your want, fill any smaller gaps with other small treats like candies, sprinkles, mini marshmallows, etc.
Nutrition Information:
Yield:
8Serving Size:
1Amount Per Serving: Calories: 431Total Fat: 18gSaturated Fat: 7gTrans Fat: 0gUnsaturated Fat: 9gCholesterol: 6mgSodium: 262mgCarbohydrates: 65gFiber: 4gSugar: 38gProtein: 6g