Nightmare Before Christmas Halloween Charcuterie Board (Jack & Sally)

This post contains affiliate links. I only recommend products I use and love. Read the full disclosure here
Jack & Sally Halloween Charcuterie Board is the spook-tacular snack that’s equal parts creepy, cute, and totally photo-worthy.
Who says charcuterie has to be serious? Not me! Here at Fun Food Crafts, I’m all about turning snacks into little edible parties, and this Jack & Sally Halloween Charcuterie Board might just be my favorite spooky snack yet!
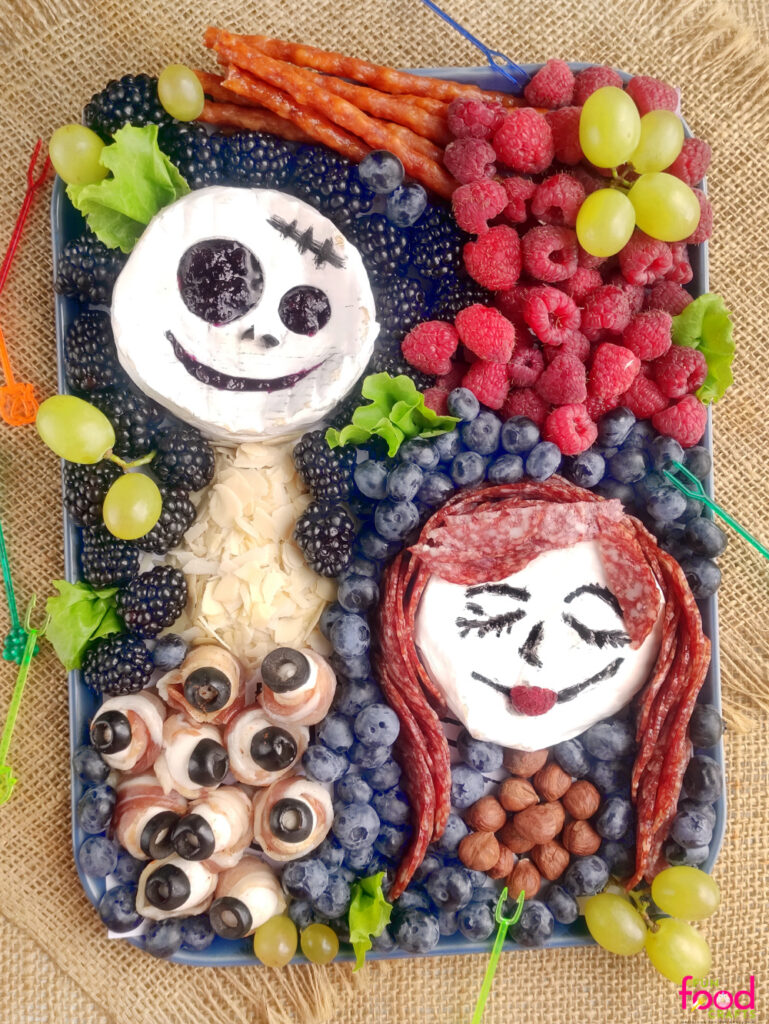
We’re talking Jack with his cheeky skeleton grin (stuffed with blackberry jam, of course) and Sally rocking the sassiest salami hair you’ve ever seen. I’ll admit, I giggled the whole time while making this because it turned out just so darn cute. The best part? It’s spooky-simple to pull together but looks like something straight out of a Tim Burton sketchbook!
It’s ghoulishly fun, wickedly easy, and the kind of treat that makes people squeal, “OMG, I need a pic before I eat this!” Perfect for Halloween parties, Summerween movie nights, or as part of your spread of Nightmare Before Christmas party food.
Why You’ll Love This Halloween Charcuterie Board 👻
This isn’t your average cheese board, y’all; this one’s got some fang-tastic flair. Here’s how you bring Jack & Sally to snack life:
How to Make a Jack & Sally Halloween Charcuterie Board
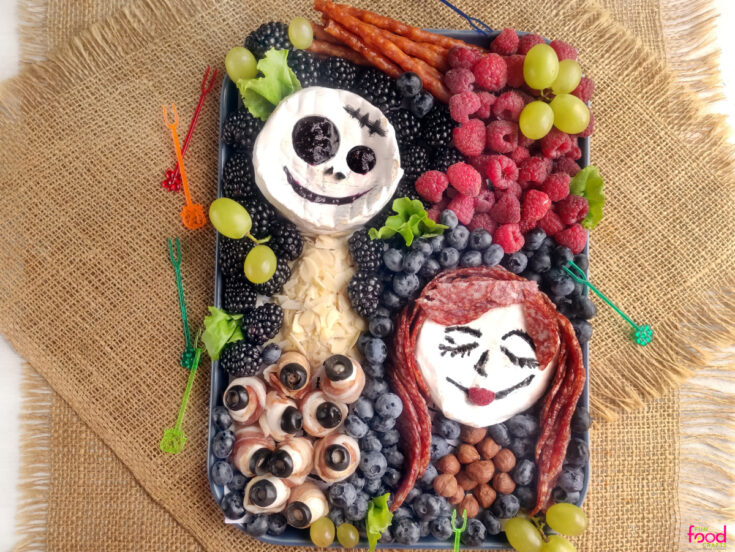
Get ready for the cutest Halloween charcuterie board ever — Jack with his cheeky blackberry jam grin, Sally rocking her sassy salami hair, bacon-wrapped mozzarella eyeballs staring you down, and a juicy berry “blood pool” to tie it all together. Here’s what you’ll need to bring this spooky love story to life:
🥄 Spooky Kitchen Tools You’ll Need
- Sharp knife
- Small round cookie cutters (2 inch AND a 2.5 inch)
- Food-safe markers
- Serving tray or board
- Small bowls (optional, for separating fruit)
- Parchment paper
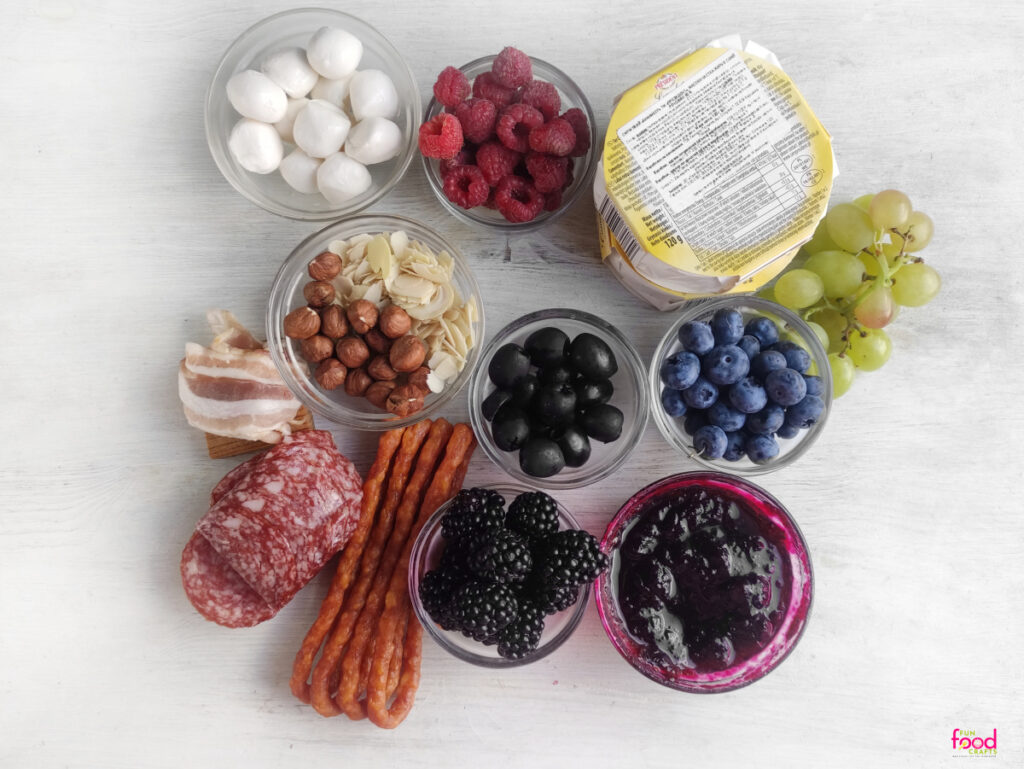
Ingredients You’ll Need for This Creepy-Cute Halloween Snack Board
Get ready for the cutest Halloween Nightmare Before Christmas charcuterie board ever — Jack with his cheeky blackberry jam grin, Sally rocking her sassy salami hair, bacon-wrapped mozzarella eyeballs staring you down, and a juicy berry “blood pool” to tie it all together. Here’s what you’ll need to bring this spooky love story to life:
- Brie or Camembert cheese wheels
- Mini mozzarella balls
- prosciutto (or store-bought pre-cooked smoked bacon for smoky flavor)
- Green olives, sliced into rings
- Blackberry jam
- Raspberries
- Blackberries
- Blueberries
- Salami slices cut into thin rounds
- Breadsticks, long pretzel sticks, or snack sticks
- Hazelnuts
- Siced almonds
- Green grapes
- Lettuce leaves (optional, for garnish)
Spooky Step-by-Step Instructions🕸️
Time to get spooky in the kitchen! These simple steps will guide you through building Jack & Sally, creepy eyeballs, and all the frightfully fun little details for your Halloween board. 🎃💀
NOTE: For Jack, you are going to carve facial features out of both the rind and the cheese, but NOT at the same time. You want to do this seperately as cutting through both at the same time can result in a less clean cut and overall design. See instrcutions below.
For Sally, you are going to leave the rind intact — no carving here! Her stitched features are simply drawn on the surface of the rind with a food-safe marker, plus a raspberry for lips.
Step One: Prep the Board
- Begin by covering your serving board with a sheet of parchment paper.

Step Two: Make Jack’s Grinning Face
- Unwrap one brie wheel and place it on the prepared board.
- Next, carefully slice off the top rind (I started about ⅓ of the way down) and set it to the side.
- On the rind piece, use a 2-inch cookie cutter to cut out one eye and a 2.5-inch cutter to cut out the other. Then use a sharp knife to carve out Jack’s wide smile.
- Carefully place the rind back on top of the cheese just long enough to use the sharp knife to lightly trace the eyes and mouth onto the soft cheese underneath.
- Remove the rind again and, using the same cookie cutters and knife, carve out the matching features on the cheese wheel itself, using the traced design as your guide.
- Next, spoon blackberry jam into the cutouts on the cheese until smooth and level with the top of the cheese wheel.
- Then carefully replace the rind on top, making sure the eyes and mouth line up perfectly with the jam-filled cavities.
- Lastly, use a black food-safe marker to draw Jack’s little scar. Jack’s ready!

Step Three: Style Sally’s Sweet & Spooky Look
- Place the second brie wheel on your board.
- With a food-safe marker, draw Sally’s stitched eyes, brows, nose, and smile on the rind.
- Press half a raspberry where her lips go.
Step Four: Craft the Creepy Eyeballs
- Wrap each mini mozzarella ball with a strip of bacon.
- Top each with an olive ring “pupil,” pressing gently so it sticks.
- Chill a few minutes if needed so they hold their shape.

Step Five: Build Your Boo-tiful Board
- Line the tray or board you will use to serve with a piece of parchment paper.
- Set Jack and Sally’s heads side by side near the center of the board.
- Cut some of the thinly-sliced salami rounds in half, and roll up the others. Place those around Sally’s face to form her hair. I used the halves for her bangs, and the rolled rounds for the rest.
- Use sliced almonds to create Jack’s “skeleton” body beneath his head.
- Scatter groups of blueberries, blackberries, and the remaining raspberries to make a “blood pool.” around them both.
- Add the bacon-wrapped mozzarella eyeballs to the board for spooky-cute vibes.
- Fill in some of the empty spaces with the green grapes, hazelnuts, and lettuce leaves (optional).
- Finish filling in the Hallween snack board with the breadsticks/snack sticks/pretzel sticks.

Step Six: Serve or Store
- Serve right away for the freshest fruit and the neatest details.
- Store leftovers in airtight containers in the fridge; enjoy within 1–2 days (berries are best eaten the day-of).
Now step back and look at how boo-tiful it turned out! 🖤Whether you’re hosting a Halloween party, planning a movie marathon, or just want to surprise your family with a snack they’ll never forget, this Halloween charcuterie board is a must.
Tips & Tricks for a Boo-tiful Halloween Party Snack Tray
- Keep the fruit cold until just before serving so it looks fresh.
- If serving at a party, prepare the cheese faces a few hours ahead and store it in the fridge.
Variations, Additions, and Substitutions
- Swap brie for camembert or even a firm cream cheese wheel.
- Try prosciutto instead of bacon for wrapping the mozzarella eyes.
- Add dark chocolate pieces for a sweet surprise.

FAQs
Q: Can I make this Halloween Charcuterie Board ahead of time?
A: Yes! Prep the cheese faces and creepy eyes a few hours in advance, then assemble the board right before serving.
Q: How do I store leftovers?
A: Store in an airtight container in the fridge. Cheese and fruit are best enjoyed within 1–2 days.
So whether you’re hosting a Halloween party, planning a macabre movie marathon, or just want to surprise your family with a snack they’ll never forget, this charcuterie board is a must.
Share Your Creepy Creation!
Did you make this Jack & Sally Halloween Charcuterie Board? If so, I’d love to see your version! Tag me on Instagram @funfoodcrafts and use #funfoodcrafts so I can cheer you on.
And don’t forget to pin this post on Pinterest or share it with your fellow Halloween fans — it’s a board worth showing off before anyone digs in!

Looking for More Spooky Snack Ideas?
Keep the creepy-cute vibes going with these fun Halloween charcuterie ideas and other spooky snacks that are frightfully easy to make! And if you’re planning a Nightmare Before Christmas party,
- Frankenstein Twinkies (from my other blog, Bullock’s Buzz)
- Ultimate Halloween Candy Charcuterie Board
- Spooky Witch Piñata Cookies
Printable Recipe Card
Nightmare Before Christmas Halloween Charcuterie Board
This Jack & Sally Halloween Charcuterie Board is a creepy-cute Nightmare Before Christmas charcuterie idea with brie cheese faces, spooky mozzarella eyeballs, and a mix of sweet and savory treats. Perfect for a Halloween party snack tray or a fun Halloween charcuterie idea that doubles as décor! 🎃💀
Ingredients
- 2 discs of brie or camembert
- 10–12 mini mozzarella balls
- 6 slices prosciutto (or store-bought pre-cooked smoked bacon for smoky flavor)
- 5 olives, sliced into rings
- 2 - 3 tbsp blackberry jam
- ⅓ cup raspberries
- ½ cup blackberries
- ⅓ cup blueberries
- 3 oz salami, thinly sliced into rounds
- 10 long breadsticks, snack sticks, or long pretzel sticks
- ¼ cup hazelnuts
- ¼ cup sliced almonds
- Small bunch green grapes
- Lettuce leaves, optional
Instructions
Note: For Jack, you will carve the rind and cheese separately for neat features. For Sally, you will leave the rind intact and use a food safe marker to add her features
Step One: Prepare the Board
- Begin by lining your serving board with a sheet of parchment paper.
Step Two: Make Jack's Face
- Unwrap one of the brie cheese wheels and place it on the prepared board.
- Next, carefully cut off the white rind starting about ⅓ the way up the cheese. Be careful and keep it whole as you will be using it. Once done, place the rind to the side on a cut-safe surface.
- Using a 2 inch and a 2½ inch round cookie cutter, cut out two eyes from the rind. Then using a sharp knife carve out Jack's mouth.
- Place rind back on cheese for a moment, and use the sharp knife to lightly trace the features so they line up perfectly, then set the rind back to the side.
- Using the tracing as your guide, carve out the matching eyes and mouth from the cheese.
- Fill the cutouts with blackberry jam, then replace the rind on top of the cheese to where they facial features line up.
- Use a black food marker to add his scar.
Step Three: Create Sally's Face
- Place the second wheel of brie next to Jack on the board.
- Use the food safe marker to draw Sally's stitched face.
- Add half a raspberry for her lips.
Step Four: Make the Creepy Eyeballs
- If needed, cut the prosciutto (or precooked bacon) into thinner strips and wrap them around each Mozzarella ball.
- Top with an olive ring "pupil"
Step Five: Build the Board
- Cut some of the thinly-sliced salami rounds in half, and roll up the others. Place those around Sally's face to form her hair.
- Use sliced almonds to form Jack’s “body.”
- Fill in some of the empty spaces around Jack and Sally with the berries to make a spooky “blood pool.”
- Add the eyes in a group followed by the grapes, hazelnuts, eyeballs, optional lettuce leaves, and breadsticks to fill in remaining empty space.
Serve right away for freshest look. Enjoy!!
Notes
Store leftovers in airtight containers in the fridge; best eaten within 1–2 days.
Nutrition Information:
Yield:
1Serving Size:
8Amount Per Serving: Calories: 88183Total Fat: 6518gSaturated Fat: 3806gTrans Fat: 0gUnsaturated Fat: 2174gCholesterol: 22952mgSodium: 187504mgCarbohydrates: 817gFiber: 19gSugar: 376gProtein: 6467g